Cute “Key To My Heart” Craft
While searching for fun craft projects to pass the time, I came across this adorable Key to my Heart idea! It is super easy and fun to make. This will be my very first tutorial blog post so bare with me. I always see tutorials where I wish they had given more details so I took a TON of pictures of the way I made this.
Here is a list of supplies:
- Fabric of your own color choice
- Red and another color choice of felt (the second color will be for the smallest heart in the picture below)
- Velcro
- Hot glue gun (optional)
- Needle and thread
- Measuring tape (optional)
- Ink pen or small point marker
- sharp scissors
- Key

The picture above shows the different cutouts you will need to make. You will need 2 vertical side pieces, 2 horizontal side pieces (a little shorter in length than the vertical ones), and 1 much longer piece (the peice along the bottom of the picture). The long piece is roughly 11” in length and 1” wide. The fabric color is your choice. As you can see, I used a red and black plaid for my sides and the longer piece of fabric. I used an old shirt that I could not wear anymore. Seriously, all of this stuff I had lying around my house. I did not have to buy a thing. You will also need to cut out two rectangular pieces of fabric, preferably a white color, as shown in the picture.The white fabric was cut out of an old onesie my youngest daughter grew out of. I used red felt for the larger heart and a off-white/cream felt for the smaller heart. The picture below will give you an idea of how big to make the cut out pieces of fabric and felt.

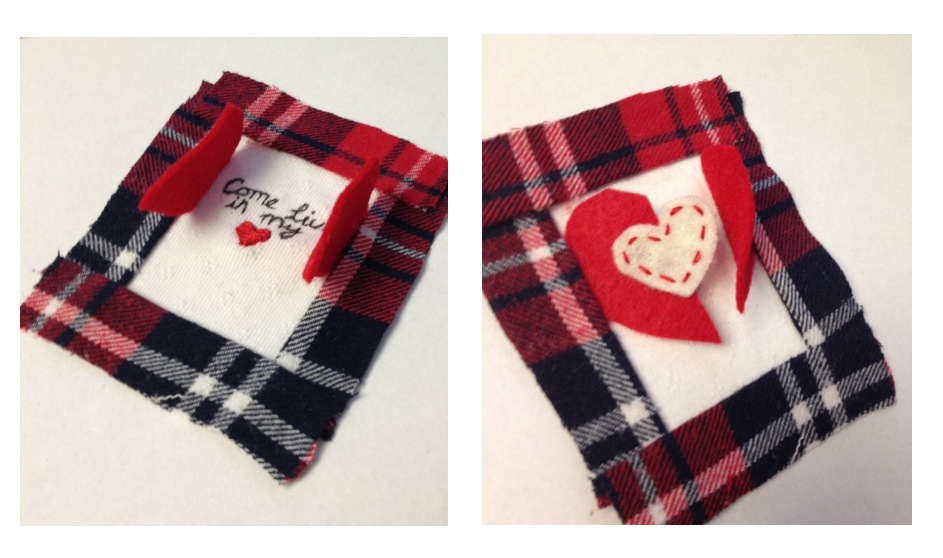
As you can see, my fabric is not cut out in perfectly straight lines and that is OK. I will deal with that problem a bit later. The next step, after having cut out all your pieces, is to write the message on the smaller white piece. I simply used a ball point pen. After doing that you will need to stitch in the drawn heart. The original steps I used called for embroidery floss which I did not have. Instead of that, I doubled up on the red thread and used that to stitch it. The picture below will explain this better. When adding the message, be sure to put it small enough that the red felt heart will completely cover it when it is closed. This is also shown further in the pictures.
 This picture shows the written message as well as the way I threaded the needle. Notice how I put both ends threw the hole. Then I pulled the two sides together and tied a knot at the end. This made it so that my thread was actually 4 pieces together instead of two. All that did was make it thicker for me and easier to fill in the heart like so…

Remember, this is the smaller of the two white fabrics. And be sure to put it in a spot that will be covered by the felt heart like this…

The next step is up to you an how you do it. I am very partial to my hot glue gun, mostly out of impatience. For the two pieces on the side of the heart, I used my glue gun to stick them to the white fabric. This can also be done with needle and thread. However you do it, make sure you are only doing the small side pieces of the felt heart and not the heart itself.

I also pinned the heart in place so it would not move. In the above picture, I am holding up the side piece so that I can add a small dot of glue.
After I have my heart stationary on the white fabric, I now moved to the sides. Now, to deal with the issue of the uneven cut. I folded one side of the fabric over, maybe 1/2 cm and glued it down. I did this to all four side pieces. Remember, you do not have to use a hot glue gun. A needle and thread will do the trick just as well. However, if you do use a needle and thread, try to make the stitches as small as possible.

This is a front and back view. Even after this, the sides are not perfectly straight. But again, that really is ok. I think it gives the finished project character.
Once I had all four of my side pieces ready, I glued them onto the small white fabric with the red felt heart.

Now to finish the heart. Take the smallest heart and stitch around the outside. I used the same technique to make my thread thicker as I did with the drawn heart on the inside.
I folded back the red felt heart to crease it and allow for easy opening. I then glued down one side of the small heart to the red heart like this…

This is where the velcro comes in. I cut off a very small piece of the “hook” side and attached it to the underside of the small heart. I had velcro already. If you do not have it, then it is sold very cheap at almost any store, including Walmart. I bought mine for under $2.00 at Michaels. This is how I attached the velcro.

The hook side is all you will need. It will catch onto the felt and hold the heart down, creating a type of door.

We can now move on to the back side of the project. Take the large piece of white fabric and lay it over the back of the other side. Like this…

Then, with whatever method you choose, start to attach the white fabric to the front. I folded over the white fabric and attached it to the other side with glue. I folded it under to give the project a little thickness. The picture below shows one side that I did. Leave the top alone for now and just attach the two sides and bottom.

Once I had my two sides and the bottom attached, I went to the long piece of plaid fabric. To get this ready, I folded the fabric in half…

And then I stitched the sides together with needle and thread. I used an overcast stitch simply because I personally like that look. You can use whatever method you think is best.

I just went straight down the side. Do not worry about the end pieces because they will be hidden.
Now, back to the (almost finished) project. Attach the top of the white fabric to the front side making sure to leave the center open like this…

The middle should be wide enough to allow you to insert the ends of the long piece. Before you insert the ends into the opening, add a key onto the piece. I have used a skeleton key, but any key will work.
After you have the key on, insert the ends into the opening at the top and glue (or sew) down the top like this..

After that, your finished! The end result is an incredibly cute little gift to give to someone you love. Mine, of course went to my husband who loved it!
Have fun with this. There are a few cute little additions you can do to it and a whole world full of different fabric choices. Thanks and be sure to let me know if you try it out and what your loved ones thought in the comments below!
0Melissa
Melissa Northway, M.S. is a mom, founder of dandelion moms, and a children’s book author. Her award-winning book Penelope the Purple Pirate was inspired by her little tomboy. Penelope is a modern-day Pippi Longstocking who teaches girls and boys the importance of having fun while at the same time teaching them to be kind and respectful of others and their differences. Dandelion moms was created for moms to share their stories and to inspire and be inspired! You can reach Melissa at: info@dandelionmoms.com and follow her @melissanorthway and @dandelionmoms. Check out her author web site at: www.melissanorthway.com, as she hands out loads of goodies from the treasure chest.
You May Also Like
PBS Kids Nature Cat Encourages Kids to Explore the Great Outdoors

Kids will love Camp Google – an online summer camp
