Decorate with a DIY Butterfly Flutter
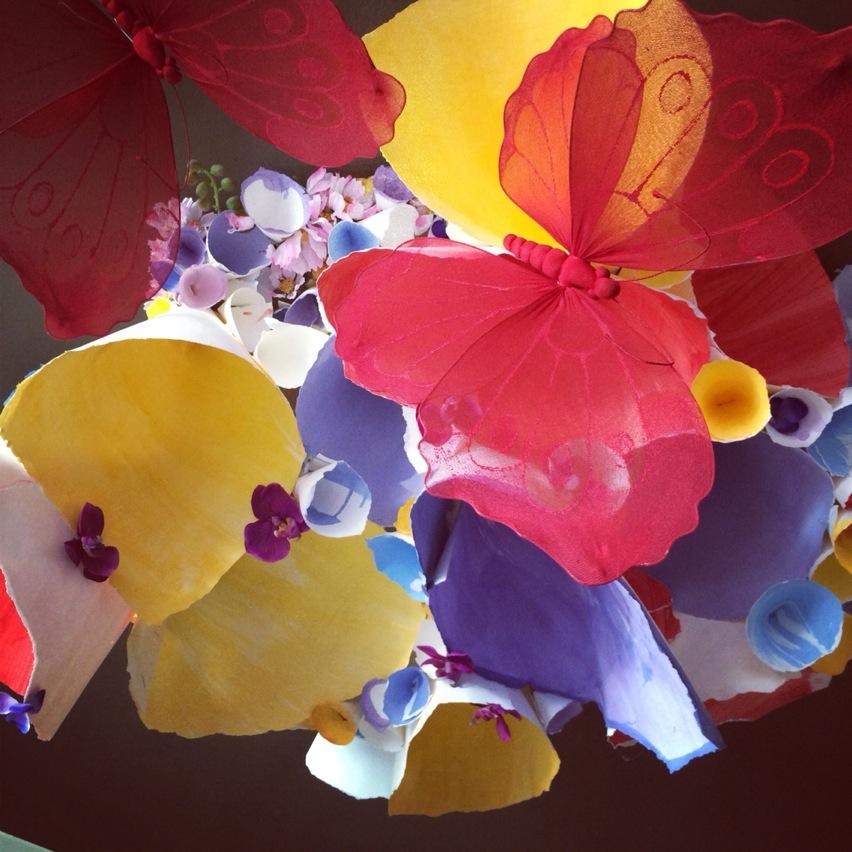
A few months ago I went in to my favorite Vietnamese Restaurant, The Coffee Factory, that is located on Brookhurst in Westminster. This restaurant is the real deal and is run by two sisters and their mother. The food is amazing, the coffee divine and the treats – well, let’s just say you really need to try a traditional chocolate crescant – the way it is really made in Europe and Vietnam! So tasty! Anyhow, I happended to look up while waiting for my soup and saw this:
It was so unusual and really cool to look at. I absolutely love butterflies and read recently that they have been around for about 130 million years and there are about 12,000 different species of butterflies in the world. A group of butterflies is called a Flutter – so I thought we could call this DIY project the Butterfly Flutter! I asked Anh (one of the sisters) about this gorgeous display and she told me she made them. She said it took her hours and hours to make them because she had two rooms to cover. You can decide how large or small you want to make this display as I think this would absolutely amazing in a little girls room, teenager’s room or even at a wedding as the arch! Here is how she made them:
What You Need:
PAPER – Get some paper at your local crafts store. The paper needs to be thick enough so that when you tear it – the edges are rough. You want a worn look to the edges.
WATER BASED PAINT – pick the colors you or your daughter want.
PAINT BRUSHES – use the sponge types to get the look you want.
GLUE GUN/STICKS –
STAPLER –
BUTTERFLIES and FLOWERS – in a variety of sizes

Directions:
Anh said that she tore the paper into different size rectangles that can be folded up into a cone. Again, make sure to get paper that is thick enough (but not too thick) that when torn will have a rough edge to it. This looks better than if you cut the paper into rectangles but you can do this if you choose!
Lay them out and start painting! You can get your kids involved with this activity! She didn’t paint them all the way around but you can if you want. I liked that some were painted halfway, the tips only and left white on the outside. But this is your creation so do as you wish!
Once the paint is dry, start folding them into cones like this:

Anh said she stapled the cones together as well as hot glued them. Just make sure you can not see the staplers.
Pick the section on the ceiling you want the butterfly pod and get ready to glue to your hearts desire! She used hot glue because she said this was the easiest way to make sure it stuck to the ceiling. You can work with the painted cones as you wish. She switched up the sizes, large and small, and found it best to attach the smaller cones to the large ones as can be seen in the picture above.
Once the pod is in place – start adding in the flowers and butterflies. She glued the flowers to the tips of the cones as well as inside the edge. Have fun with this rather unique and colorful Butterfly Flutter!
To take it a step further, you could talk about the different types of butterflies in your state, about how some migrate and what they eat and where they sleep!
What is your favorite type of butterfly?
0
Melissa
Melissa Northway, M.S. is a mom, founder of dandelion moms, and a children’s book author. Her award-winning book Penelope the Purple Pirate was inspired by her little tomboy. Penelope is a modern-day Pippi Longstocking who teaches girls and boys the importance of having fun while at the same time teaching them to be kind and respectful of others and their differences. Dandelion moms was created for moms to share their stories and to inspire and be inspired! You can reach Melissa at: info@dandelionmoms.com and follow her @melissanorthway and @dandelionmoms. Check out her author web site at: www.melissanorthway.com, as she hands out loads of goodies from the treasure chest.


2 Comments
Ruby
Wow, this is such a beautiful craft idea, I know my daughters will love to try it for their new bedroom when we move!
Lauren
I love monarchs! What a beautiful butterfly flutter!