DIY Antique Photo Shelf
Today’s post is sponsored by MyPrintly from HP Inc. and Mom Select
You might have heard about HP’s new site, My Printly.com which offers an exciting array of DIY projects, ideas and tools. Many moms have been visiting the site for crafts and printing solutions, from party décor to suggestions for turning your photos into cherished keepsakes.
I was asked to participate and create a fun DIY craft using the HP’s new line of paper that can be personalized for any occasions. They offer personalized paper with rounded edges (great for special occasions), regular square edges and my new favorite, the Polaroid-inspired sheets. I decided to create an easy DIY wooden crate photo shelf and I hope you enjoy it – I promise it is easy to duplicate! Make sure to check out the MyPrintly website for even more creative ideas!
What You Will Need:
An antique wooden crate (check eBay, local garage or estate sales or if you want a regular wooden crate, check Amazon or Walmart!)
Chicken Wire
Photographs
Nails
Metal paper clips

Step One: Print your favorite family photographs!
You can use any photographs you might have laying around but I have to say I am in-love with the new HP 4×5 Sticky-Backed Sheets that come out looking like an old-school Polaroid picture! If you grew up in the 70’s or 80’s it was all about Polaroid pictures and it appears to have come full circle with Taylor Shift’s new album 1989 design cover! Love it!

MyPrintly Offers Mobile and Desktop Tools:
What is so great about using these papers is how easy it is to print them out on your HP Printer. All you need to do is download their HP Social Media Snapshots App available in the app store for free and you can print out any of your zillion pictures from your iPhone directly to your HP Printer. Make sure to check out all the tools they provide here. They offer HP Photo Creations where you can create your own calendars, personalized cards, scrapbooks and more! Also their customized greeting cards are super easy to create and print out.

And one of my favorites, their HP Social Media Snapshots App where you can download and print directly from your Instagram account or other accounts! Just choose which photo you want to print:

And them choose which template you want to use. Write in your text (each template has a different font).

And that is it! I think you will fall in love with all the cool things you can do and create with the MyPrintly site and tools they provide us moms so we can create to our hearts desire.

Step Two: Find a wooden crate you love!
You can use any wooden crate you might have around the house or look online on eBay for an antique one that you love! I’ve had this antique in my closet for years waiting for a place in our home and so happy to finally have found a creative way to display this fishing crate from France a friend brought back for me oh, probably 15 years ago! No joke! See, you never know what goodies you might have already!
Luckily for me, this already had a chicken-wire type backing, but it would be really easy to duplicate this in your newfound wooden crate. You could either attach chicken wire to the inside or take of the back part of the crate and nail the chicken wire on each side. Voila – super easy!

Step Three: Arrange Your Photographs
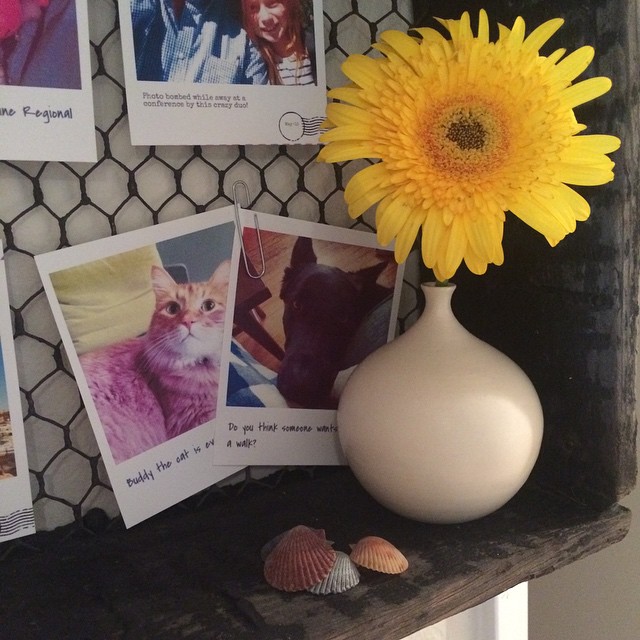
Next, print out your photo’s and lay them out in the wooden crate how you like them best. I like the look of using metal paper clips and attaching them on the chicken wire. One of the many things I love about the HP Social Media Snapshots App is the many choices they provide with when designing your photographs. With some of the pictures, I chose the postcard-type background to use with photographs that were taken on trips. This would be such a fun card to send to family members or friends from your recent travels!

Step Four: Now Display!
We moved the wooden shelf around our place to see where the best spot would be. We tried the dining area:

But decided on a location near the laundry room since this wall has been barren too long in my opinion!

You can change out your most recent photographs easily since all you have to do is clip in the new ones with the paper clip! But you could forgo the clips if you prefer as these polaroid papers have a sticky back! Just peel off the back and place on any surface you want. You could place your favorite vase and flower on your new photo shelf. And add in some items you found from your last nature walk! We found these sweet seashells from our last trip to the beach that will be a great reminder to slow down and enjoy the day as I am rushing to and from the laundry room (which in our house is a daily occurrence!).

I hope you are inspired to create your own wooden photo shelf with your latest family adventures!

Enter to WIN an HP Printer:
And exciting news! HP is running an exciting giveaway! runni Entry is easy- all you must do is simply follow @MyPrintly on Twitter, Facebook, Pinterest, or Instagram, and then complete this brief entry form in order to be entered for a chance to win one of three (3) HP Envy Printers: https://bit.ly/
This post is part of a sponsored campaign with MyPrintly and MomSelect. All thoughts and opinions are my own.
0


