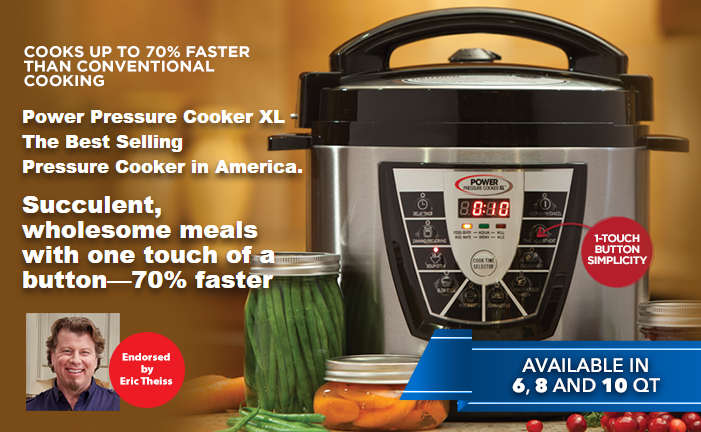
No Cooking Under Pressure with the Power Pressure Cooker XL
The last six months I have listened to my friends rave about their “lemming” pot. I would read and listen intently and never really thought about it. To me, I thought it was for “larger families” and not my small one. Then one night after the holidays were in the rear-view mirror I woke up to the tele (yes, I’d left it on) and there on my television was the Power Pressure Cooker XL. I have never been as fascinated as I was right then and there (and still am). I wanted to make ribs, macaroni, chili, and everything else in a fraction of the time, in one pot no less; and just like my friends. I wanted to be a “lemming” too!

I have never been so excited to receive a product before. I have become joined at the hip with the Power Pressure Cooker XL. There are a ton of Facebook groups and communities, along with youtube videos from Fusion Life Brands and the chef behind the Power Pressure Cooker XL: Eric Theiss, to blogs and recipe swaps. I have never been a “lemming” before and now that I am I totally get it and see why.
The Power Pressure Cooker XL isn’t just a pressure cooker. It’s also a slow cooker, has a delayed timer, you can do soups/stews – it’s just so versatile and I look at it in amazement. I am constantly thinking: where have you been my whole life! If I cooked a lot before then you can imagine what I’ve been up to the last almost two weeks. It is phenomenal and it infuses the flavor in the items I’ve made unlike anything before. I’ve stopped using everything else. I haven’t needed them. I feel like cooking this way is healthier – not to mention so much easier/faster. I’m so short on time as it is with having therapies to take my son to, or after-school stuff going on for both him and my daughter. No longer do I have several items on the stove top and the oven on or oops I forgot to defrost or they changed their mind. None of that matters anymore. I cannot rave about the Power Pressure Cooker XL enough!
One of the things I have been trying to do is take my own recipes and convert them into the Power Pressure Cooker XL – which, can be trial and error on my part. Some of the things I cook I haven’t exactly found a recipe that is similar to mine or exactly the way I do it. Others are almost spot on. I really thought I was being the clever one when it first arrived and what I had in mind to make. I kept seeing all these recipes for barbecue chicken (legs mainly) and I use boneless chicken thighs (kids – once I made them they/she never looked at a leg again) so I thought I was clever. So, I set about to make them – and pretty much combined the what is called for with my own and I have to tell you it was mouth-watering. Same for the macaroni. I think most of you know that I make my own variation of it. No matter if I cook it on the stove or in the Power Pressure Cooker XL I enjoy scooping it into my ramekins afterwards and adding breadcrumbs on top, sometimes with a little more cheese and sometimes not. Only now I’m able to do all this in one pot and it’s a breeze.

While I work my way through some of the recipes passed down to me from my maternal grandmother/mom and then my paternal grandfather and adapt them to the pressure cooker I’ll share those with you. I’m also teaching my kids how to use the Power Pressure Cooker XL which to me is going to be a very rewarding experience (for them and myself) as most of you know my son is on the autism spectrum. So short and simple tasks really work for him and so far he’s really enjoyed making me dinner and learning a skill.
Hopefully you’ll find something different about my recipes and enjoy them as much as we do. Some may be total fails (on my part) and I’ll tell you about that too (just in case there are tips and tricks) as I learn to convert measurements and seek guidance from groups and others wherever assistance comes from – you’ll know and hopefully it will make navigating/questions easier.
By-the-way, the wonderful people at Tristar Products/Fusion Life Brands graciously have offered a $25 discount off any size of the Power Pressure Cooker XL with the code: SAVE25
I can’t say enough great things about the Power Pressure Cooker XL. I’ve had absolutely zero issues with cleaning it and I’ve yet to have anything stick – it has a non-stick inner pot. The valve releases easily and scared the dickens out of me the first time I used it (water test), however, that was just me as I could and would and have jumped at my own shadow – my kids think this is hilarious. Now I’m used to it and it and reminds me of my dad’s kettle going off without the whistling (depending on what I’m making and how much pressure there is) and while we’re on it, I have run across reading in one of the communities on Facebook where some had some stickiness left over after making macaroni. I haven’t had to try this yet (but the source of who it was that shared it is why I’m sharing it with you): one to two scoops of OxiClean with two cups of water and you can use either the soup/stew OR the canning button [most say] around 10 minutes. Actually, to me, that may be a great way to do an extra-cleaning here and there if need be just to do every now and again (don’t forget it is dishwasher safe) to sanitize. It’s such an easy clean up for me that I’ve been washing it by hand.
So here’s a couple recipes and again, I’ll be back each week with more and more recipes from desserts to meals – just all the things a good “lemming” makes!
Enjoy!

Boneless/Skinless Barbecue Chicken Thighs
- 8 to 10 boneless/skinless thighs
- olive oil
- 2 cups barbecue sauce (your own or favorite brand)
- 1 TBSP. liquid smoke *optional and you choose flavor*
- salt
- pepper
- other seasoning (if you like)
- Turn the PPC XL on and select Chicken/Meat;
- When the inner pot warms up add olive oil (I use enough to coat the bottom);
- I lightly coat the thighs with olive oil too – and then add seasoning (paprika or smoked paprika depending; salt; pepper or white pepper – again depends on what I’m aiming for taste wise);
- Place the thighs in the inner pot and and brown on all sides;
- I make my own sauce especially if making spicy (if interested let me know and I’ll share as it’s great on ribs) – cooking for the kids I don’t go this route so I pick out my daughter’s favorite and then I add a few things: dijon mustard, Worcestershire sauce, splash of orange juice and the liquid smoke – in this case, mesquite;
- Pour in the barbecue sauce and coat all the thighs by tossing or turning them over to coat;
- Place the lid on the pressure cooker and lock it. Make sure your valve is set to closed;
- You’ll see the display still moving as it was when you were browning – it will build up pressure then start automatically;
- Once done you will hear the pressure cooker beep – this is where you will release the valve (do not do by hand) I do this with either an oven mitt/kitchen towel or even a wooden spoon by given it a nudge on the part of the valve where it is raised up and out a bit; and
- Let it completely release all the steam before opening and you are done. At this point remove the thighs and if you prefer a little more crunch just transfer to a baking dish for the oven or broiler for several minutes or just serve as is (my daughter does not like them crispy) and enjoy alone, over rice or other and with any sides you made!

With the remaining (if any) thighs I saved them to use in my chicken tortilla soup and it was delicious! I’ll share that soon.
I had a video I was going to share, however, using one hand to hold the camera and one hand to cut the super juicy and tender thighs … it’s not the best quality so I opted not to share this time. Trust me on it being so tender – I used a small children’s fork! If there had been any bones the meat would have fallen off!

Macaroni and Mucho Cheese
I did my recipe backwards for the pressure cooker regarding milk/cream and cheese. It worked, however, I am going to play around with it and see if different ways give me different results (good or bad) and I’ll let you know.

- 1 cup milk
- 2 cups heavy cream
- 16 ounces of noodles (your choice – this time I used rigatoni although any will do)
- 4 ounces Gruyere (shredded)
- 4 ounces Havarti (Taleggio if you have and shredded)
- 2 ounces Gorgonzola (shredded)
- 2 ounces Parmigiano (you’ll need a tad over if you want to add shavings when complete – all shredded)
- 1/3 cup plain bread crumbs or Panko (fine)
- Kosher Salt
- Freshly Ground Black Pepper
- Extra Virgin Olive Oil
- 2 cups Water
- 2 to 4 TBSP butter
- Place the inner pot into the pressure cooker and select the Rice/Risotto button;
- After it’s warm I pour in extra-virgin olive oil to coat the bottom and then the butter – until the butter is melted;
- Add the water and then the pasta (I squirt a little more EVOO in and toss the pasta around). Cook open until all or majority of the water is absorbed into the pasta;
- Add in the salt, pepper, and again a little olive oil and stir – coating all of the pasta;
- Pour in the milk and heavy cream;
- Add in all of the cheeses (I did not stir);
- Place the lid on the pressure cooker and lock it, making sure the valve is closed;
- Press the Warm/Cancel button; and
- Select Rice/Risotto button then time adjustment until 8 minutes is reached.
- Once it hits zero you will hear it beep and you will need to open the pressure release valve (same way as before – as long as you do not use your bare hands) and the pressure cooker will automatically revert to the KEEP WARM setting. As soon as I’m able to remove the lid I turn off the pressure cooker.
- I stirred the macaroni and then plated for my daughter and of course I tasted it (a few times *lol*) then I started filling my ramekins. I added the bread crumbs over each ramekin and then if you saved any or would like to add any of the extra Parmigiano you can. Place the ramekins on a baking sheet and under the HIGH broiler for 3 to 5 minutes – then serve (or you can do this then store them for the week or skip the broiling and wait to do that part until after you reheat for dinner or lunch during the week; normally I do all the steps and just reheat over the next few days).

It was delicious! I only used ONE pot and I absolutely loved that! I’ve become best buds with the Power Pressure Cooker XL! I actually think I’m in love with it but I try to only whisper sweet nothings when I’m experimenting with my recipes in the hopes that it likes me back just as much and there’s not a big flop at the end.

I’m really looking forward to bringing you lots of different recipes over the coming months – with video too! I can’t wait to can some of our spaghetti sauce or make yogurt and applesauce! YUM! Then all the soups and main courses. I keep asking myself: where this has been all my life then realize I had never “gone with the flow” and jumped on the “lemming” bus before. I can officially say that life as a “lemming” has been a real pleasure and my taste buds, tummy, and kids can all agree with that sentiment!

Again, in case you missed it above, you can order a Power Pressure Cooker XL and save $25 by using code: SAVE25
By-the-way, I wanted to show you the bottom/inside of the Power Pressure Cooker XL after removing all the macaroni from it and putting into the ramekins and/or dishes for dinner (nothing burned):

To order or read more about the Power Pressure Cooker Xl which is available in: 6 quart, 6 quart pro – red or black/stainless steel, 8 quart or 10 quart and the features that each have (including bonus features) head over to Power Pressure Cooker XL‘s website and use code SAVE25 to receive $25 off your order.
Find and Like Fusion Life Brands on Facebook here
Find and Follow Fusion Life Brands on Twitter here or @FusionLifeBrand
Find and Follow Fusion Life Brands on Pinterest here
Subscribe and watch Fusion Life Brands on youtube here for recipes and more
I’ll update next time with various communities and groups and even include some of their youtube videos that may be of help to me as I navigate my way at and through different recipes. These links will include Chef Eric Theiss’ (the genius behind the Power Pressure Cooker XL) cookbook, Facebook and more! Until then: Happy Pressure Cooking, y’all!
*I received a Power Pressure Cooker XL from TriStar Products. This has in no way influenced my feelings about their product. All opinions are my own.
1
Charly
Charly is a divorced SAHM of two kids (varying SN). She loves sweet tea (x1gazillion), watching TV (too much of it), CHOCOLATE, anything tech, cooking/baking, and her kids! Born, raised and resides in the South. Fan of: Rob Lowe, Jason Bateman and John Stamos. A sci-fi, used-to-be girl gamer, lover of books, art and music. Has a passion for organizations that reflect her life's journey before and after kids (thus far): Domestic Violence/Battered Women, United Mitochondrial Disease Foundation (UMDF), The Autism Society, MitoAction, Epilepsy Foundation, The Children's Heart Foundation, SPD Foundation, NORD/Global Genes and spreading autism ACCEPTANCE. She can be wickedly funny/witty - okay, sarcastic (in a good way of course) forever keeping us on our toes! But we love her ... anyway. She is a *dandelion mom*: beautiful, strong and resilient. Twitter: @OneAppyMama Facebook: https://www.facebook.com/OneAPPYMama


17 Comments
Schelly
Hi Charly, did you get the 6 quart? I’m considering my options – typically, I cook up all the dinners we’re going to have for the week so all I have to do is heat them up on weeknights – but with as fast and easy as this looks, maybe we can actually start eating fresh again. Also – do you have the regular or the Pro version, and in your opinion which is better? Thanks in advance for your opinions.
Charly
Schelly: I am not sure why I was never alerted to comments (nor did they show on the browser I was using – and don’t now either … then shortly after the post I did after this one I had surgery and things have been *blah* since) so my apologies all the way around! I don’t have the Pro just the large PPCXL – the 10 quart as I freeze a lot and/or have company with lots of kids etc coming and going and in order to can and have the yogurt feature. I don’t know the difference between the pro and the xl’s? I think the only difference in having the 10 quart is being able to make yogurt and can? My daughter was (and is/has been) a huge help during surgery and still being able to use this. Plus if need be I am able to put a lid on/take off as opposed to using an oven and just thinking of that makes me wince in pain. I know that during the summer those that help us out sure loved using it along with my kid(s) and not having a hot kitchen from the oven/stove going! Hope you’re still enjoying yours!
Lor
I have the power preassure cooker pro 6quart i want to use the slow cook button but i am unsure about the lid and if you are tleave the valve open or not my instruction booklet dose not give me that info.
Charly
Lor:
I’ve apologized multiple times this evening and won’t bore you with the same response of why I missed your comment/question! Just know I am extremely sorry many many many times over (and then some)!
I am sure by now you have figured this out/found the correct answer.
If not, or for any one else looking that ends up here OR if someone happens to read your comment and then thinks “good question” at least it will finally have an answer.
Just leave the valve OPEN. Don’t close it. You don’t need the glass lid (if it came with or not – or it can be purchased separately off their website) http://bit.ly/2iVfmax if it doesn’t open up with the glass lid showing just click LIDS & GASKETS – I think the glass lid is currently just for the 6 quart PPCXL though as I don’t think they are as of yet selling the glass lid for the other sizes (again: yet).
The PPCXL Slow Cook button toggles through 2 hours/6 hours/12 hours depending on selection of QUICK-MED-WELL (you didn’t ask this – just thought I’d throw that out) *lol*
Again, sorry and Merry (belated) New Year to y’all!
Joseph
Hi, Joseph here,
How do you clean the rubber gasket from food odor ?
Charly
Hi. If you’re meaning the gasket (seal) around the top/lid then I just remove it and clean it (wash it) with water and dish soap (I use Dawn original). I take all my parts off like that and wash them that way. Then put them back on when they’re dry – I air dry them. I hope that helps and is what you’re referring to. 🙂
Kara
Hi! I’m so glad I found your website! I look forward to trying your pressure cooker recipes! 🙂 When using the Power Cooker XL as a slow cooker, do you keep the valve closed? (I don’t have the glass lid.)
any help or suggestions are GREATLY appreciated! Thanks!
Charly
Well, I’m waaaay late and lots of money short! So sorry, Kara. As I have repeatedly written tonight on this post: I did not receive any alerts/notifications about comments and they never showed nor are they showing on the browser I prefer or did prefer to use along with having gone under the knife again not long after the second part of this post was written and I was (and still am) trying to recover from that mishap of a surgery.
By now you’ve most likely received or found the answer. In case any one else happens to read and needed to know this or finds themselves needing to know I will go ahead and respond.
When you use the Power Pressure XL as a slower cooker – you are able to use the regular/lock lid that comes with the PPCXL just make sure the valve is OPEN and not closed. They do have a glass lid, however, I believe it is currently only sold in the 6 quart size (I’m not sure if it comes with or sold separately)? I may be wrong as they may have in the other sizes by now but you don’t “necessarily” need it. Now I’m curious and will mentally put that on my list of things to do tomorrow – check their site about the glass lids. If they don’t then maybe I’ll get the girl to try out some of our glass lids and see if any fit for the heck of it *lol* and if not, measure and maybe try some to see if any available options hmmm Again, sorry for the very long delay in responding and hope you had a safe and wonderful New Year (and all the stuff in-between) 🙂
Joanne Henderson
LOVE your recipes! Have been enjoying my Power PressureCookerXL for two weeks now. Would love to have the full cookbook but my budget went for the ppc! Thanks for your recipes tho. I’ll continue looking online.
Charly
I am so sorry, Joanne. I haven’t received any alerts etc for comments – and on another broswer it shows none at all (wonky) or I would have responded. I see ones older than yours as well 🙁 I was down and out as I had surgery and I’m unfortunately worse than I was (if possible *lol*) Anyway, I don’t have the full cookbook either *boo* However, I do list at the bottom on this blog: http://bit.ly/1S3hw2H it was like a continuation of this post some links for the PPCXL groups on Facebook with recipes and other things (and some have the recipe book or another one that is a great cookbook for pressure cookers too) and they will share NOT just on posts or comments but in the documents section and you’re able to search the group if looking for something particular. Hopefully that will or perhaps you’ve already found them and/or others etc. I hope you’re still enjoy and doing well!
Pingback:
kathy bossenberger
Do you have a PPCXL recipe for yogurt?
Melissa
I will ask our recipe contributors if they have one! If they do, we will post one for you Kathy! =)
Charly
I do. I will try and post one for you soon! If you’re making it like super soon, please let me know, Kathy, and I’ll get it over to you!
Tracy Snyder
Charly, I am wanting to make yogurt in the PPCXL. I have all the stuff. I just need the instructions for how to do it! Please?!?
Kathy
HI there. Have you posted the yogurt recipe yet?
Charly
No. I’ll do it right now. Sorry!
Ingredients:
1 gallon of Milk
2 oz. Yogurt (w/live culture)
Mine doesn’t have a yogurt button and I use the slow cooker button.
Steps:
1. Pour milk into the “inner” pot
2. Place lid on ppcxl and close – set the pressure release valve to OPEN
3. Press: slow cook button: 2 hours (set the time for)
4. At 2 hours check the temperature – you want it at 180 (not over 190 – I really try to have it directly 180/182ish)
5. When at the temp (180) press cancel button
6. Time to let the milk cool – it takes about 4 hours but can vary so start checking around 3.5 hours – as you want the temp to be at 110
7. Once the milk has cooled to 110 remove 1 cup of the milk and mix with the 2 oz of live culture yogurt
8. Gently stir in the mixed yogurt/milk back into the milk that’s in the pot (and make sure it’s all stirred – gently)
9. Place the lid back on the ppcxl and cover with a towel (I use a large one that I lay over and wrap around) to keep at even temp
10. Now you wait and wait … LOL It all depends on how THICK you like your yogurt so 7 to 10 hours
11. Check it at 7 and if you like it at that consistency fine or if you want thicker leave and come back (I’m an 8.5 hour’er lol)
12. When yogurt is at the consistency you like transfer to a container and place in the fridge.
Eat. Enjoy. Add fruit or what not to single servings you take from container (we all eat it differently here is why I do it this way) – have fun with it and nomnomnom!